
If you want to know how deepWidget differs from all of the web widgets out there, you can find more about it in this post.
If you just want to get some really quick idea about how this whole thing works, you can watch this tutorial video right here at the bottom of this screen. Note that this video is displayed using a video widget that you could easily add to your own site as well. Note also that the video bar has this cool feature where it disappears as soon as you scroll this paragraph of text out of view. This is something that you can easily add to your blog or website as well, but that's for another post later.
In this post I will show you how to use the deepWidget Sandbox to add all kinds of cool components to your website in a matter of minutes. While this post may seems a little long, believe that it is actually fairly easy.
The deepWidget Sandbox is the web-based administration portal through which you can manage the widgets on your website, blog, or Facebook pages. Why do we need such a portal? Well, this is because it is the key to make it really easy to add cool components to your site, even if you are not technical by any stretch of imagination. In addition, this portal also makes it possible to support an entirely new type of widget called the 'mashup widget' that allows 'deep integration' with the content of your webpage. Don't worry if you have no clue what this means. I will have a post on this topic shortly. Meanwhile just take it to mean that there is a new type of web widgets with amazing functions coming your way soon.
There is nothing that you need to install in order to use the Sandbox. The Sandbox is known to work with Firefox 3.5+, Chrome 7+, and Internet Explorer 9+, so you will need one of these in order to use the Sandbox. Unfortunately the Sandbox does not work with Internet Explorer 7 or 8. While this means that you cannot use IE 7/8 to manage your widgets through the Sandbox, the widgets added to your website nonetheless will work just fine even on IE 7/8.
Registration

You will need to register yourself first in order to gain access to the Sandbox. There is no charge for registration, and you won't be asked your credit card number. You will get an email after registration, and you will need to click on the link inside the email in order to complete your registration.
Alternatively you can also access the Sandbox without registration simply by using your Facebook or Twitter account. This is not yet there as of the writing of this post, but it should become available very shortly.
Note that it is important that you always use the same way to access the Sandbox. If you sign on first using your Facebook account, and later sign on use your Twitter account, then you will end up with two entirely separate accounts with no way to share anything between the two. The same also applies if you have, say, multiple Facebook accounts.
Navigate to your website
 Once you have signed on you will find yourself inside the deepWidget Dashboard. This is where you get to manage the list of your webpages that you have entered before. At this point this list is of course empty. Simply enter the URL of your target webpage into the text box at the top, and you will then be taken to the deepWidget Sandbox. There where you can begin putting the widgets that you want onto your webpage.
If for any reason you can't or don't want to enter the URL of your target webpage, you may instead enter an arbitrary text label into the text box. In this case you will then see a 'test page' inside the Sandbox for you to play with the widgets.
Adding Widgets to Your Website
 The Sandbox allows you to see a realistic copy of your webpage inside it, so that you can experiment with putting all kinds of widgets on it, adjust the widget's parameters, and preview the result to see if it is to your liking.
There is a possibility that for some reasons your webpage may not get displayed properly inside the Sandbox, and when this is detected a separate 'test page' will be displayed in its place. You can go ahead and put widgets onto this 'test page', and when 'published' (see below) the widgets will appear properly on your actual webpage.
The deepWidget technology is designed to work with any existing webpage, regardless of how it was created originally. Note however that there are some special cases where the widgets may not work properly on your webpage. This is more likely if your webpage is one of the following type:
- It is heavily protected and the Sandbox is unable to access the page
- It's page structure changes dynamically in complex manner
- It is improperly coded and contains non-standard or erroneous syntax
- It contains certain page components that are coded to be 'exclusive,' such as one that is coded to be always on top of all other elements on the page, thus covering up widgets added to the page.
Do the one-time setup
 You can skip this step if you just want to try things out. If you skip the setup you won't be able to publish the widgets to your live site for real, but you still can experiment with the widgets in the Sandbox to see whether they work the way you wanted.
The setup involves inserting one line of code into your target page. It is an 'one-time setup' because once you have completed the setup you can put all kinds of widgets on your page, remove them, or change them at will without having the do the setup again. This is something that is totally unique.
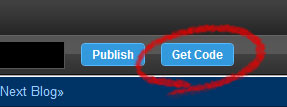
To get the setup code:

- Navigate to your target page in the Sandbox as described earlier.
- Click the 'Get Code' button and copy the code to your clipboard.
- Insert the code at the end of your target webpage, just before the closing 'body' tag
- Deploy the updated version of your webpage to your web server.
You can put the same setup code on multiple pages. If you do so then all these pages will be sharing the same set of widgets. This means that you update a widget on page A in the Sandbox, then you will find this change also get reflected on page B that has the same code installed. If you have two pages that are meant to have different widgets on them, then you should do this setup for these two pages with different setup code.
Adding a widget
Follow the simple steps below to add a new widget onto your target page displayed in the Sandbox:
- Click on the 'Add' button in the left panel. A gallery of widgets will display.
- Click on the widget that you want to add.

Updating a widget
When a widget is added initially to your webpage, it will assume some default look and feel. In most cases you do want to change some of its parameters in order to make it fit your needs. To do so:
- Find the widget that you want to change in the left panel.
- Click on the 'edit' icon there to bring up a widget editor. This editor displays all the parameters (color, text, link, image, etc.) that you are allowed to change.
- Adjust the parameters as you see fit. Note that if a parameter is of the image URL type, then you may either upload your image to your deepWidget account (limitations apply as per you account), or if the image is located somewhere else on the Internet then you may simply enter the full URL for the image. You should be able to see your changes take effect immediately in the Sandbox.
- Click on the "Save and Close" button at the top of the editor to save your changes. Note that if you neglected to click on this button and simply dismiss the editor, then the change you just made will not be persisted.

Publishing your changes

Deleting a widget
You can remove a widget previously added onto your webpage permanently simply by clicking on the 'delete' button (i.e., the trashcan icon) under a widget listed in the left panel. Note that you will then need to click on the 'Publish' button in order to get the deletion reflected on your live site.
Showing/Hiding a widget
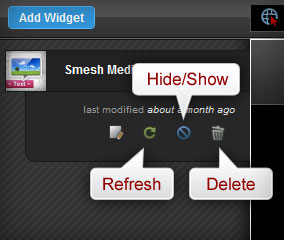 Sometimes you may want to make a widget disappear from your live site, but still keeping it around in the Sandbox so that you can do something about it later (such as making it show up at a later time). You can achieve these using the 'show' or 'hide' buttons in the left panel.
To hide a widget on the live site:
- Click on the 'hide' button for the widget to make it disappear from the Sandbox, and its corresponding control on the left panel will appear dimmed.
- Click on the 'Publish' button to make the change take effect on your live site.
- Click on the 'show' button for the widget will make it re-appear in the Sandbox, and its corresponding control on the left panel will change from dimmed to normal.
- Click on the 'Publish' button to make the change take effect on your live site.
Refreshing a widget
Sometimes you may want to refresh a widget in the Sandbox. You may need this if you want to get the latest saved version of the widget to display in the Sandbox, or when the widget has disappeared by design (e.g., for the Splash widget which disappears automatically after a set time period).
To refresh a widget simple click on the 'refresh' button for the given widget in the left panel.
So there you have it! If you are still interested, then you should check out our gallery of widgets at deepwidget.com, or follow this blog where various widgets will be illustrated in detail from time to time.
Hi,
ReplyDeleteI like this service I can see it being viable but I am concern about the age of the comments and updates I am seeing items 5 years old.
The images in the solution is a bit dated, and would serve better if you could upload your own advertising copy.
I am running a test and could work with it with some updates.
http://web.traffic.bb.s3-website-us-east-1.amazonaws.com/livenow/
Let me know.
Thanks
H Andrew Jordan, CTO
Xstream Services Inc.